Anchor Line Reel - Paul Fennell (Darnsarf)
Parts, Reel Assembly
1 x electric cable plastic spool (6"). Free from local Chandler
1 x 100mm M8 bolt and Nylock Nut (Stainless), Chandler
2 X Penny washer M8 (Stainless), Chandler
1 x Washer M8 (Stainless), Chandler
1 x 90mm Bicycle foam handle bar grip, Chandler or Cycle Shop
1 x 200mm x 30mm Dowel (depends on spools inner spindle diameter), Tackle Shop/DIY Shop
1 x 100mm of 32mm waste pipe, DIY Shop
1 X 50mm Split Pin (Stainless), Chandler
2 x 35mm Polyurethane washers, DIY Shop/Plumbing Dept
Parts, Anchor Set
100m Mouse Line (Para Chord), Chandler
0.75kg Anchor, Kayak Supplier
1m Galvanised Chain, Chandler
1 x Small D Shackle Galvanised, Chandler
1 x Cable Tie, DIY Shop
It is best to source the spool first as its dimensions dictate the dowel diameter etc.
Assembly of Winding Handle
- Drill 8mm hole 20mm in from outer edge of spool side.
- Place penny washers either side of spool side and pass M8 Bolt through from inside to out.
- Slide on handle bar grip and washer, then tighten Nylock nut until the handle is stiff to rotate.
Assembly of Central Handle
- About 10mm in from end of dowel drill a hole to accommodate the split pin.
- Insert pin, bend ends round dowel and trim excess off with pliers.
- Slide on one polyurethane washer up to split pin.
- Insert dowel into spool spindle from winding handle side trapping poly washer against split pin.
- Place remaining polyurethane washer on dowel against side of spool.
- Apply glue to inside of cut waste pipe. (Do not apply glue to outside of dowel as this could prevent the spool from rotating).
- Slide pipe onto float up to poly washer and allow to dry.
If the dimensions are the same as described for this Anchor Reel, the additional diameter of the pipe will stop the dowel from sliding out of the spool.
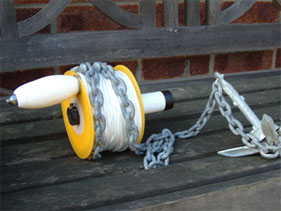
Tie on mouse line and wind onto spool. Attach end to chain. Attach other end of chain using D shackle to the tine end (back end) of the anchor. Lay the chain through the anchor tines along the shaft. Using the cable tie attach the corresponding chain link to the anchor eye. (Acts as a safety release).
Overall Result
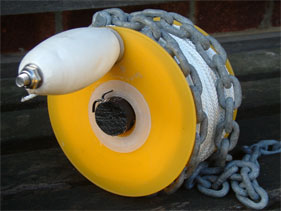
Winding Handle Assembly and Split Pin/Washer set up for centre handle.
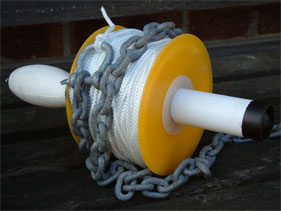
Centre handle with waste pipe sleeve (Painted end to hide obvious float) and poly washer protector against side of spool.
In all photographs above a net float is shown as handle, after rigorous testing this proved a weakness in the design and the dowel and cycle grip has now replaced it.
Thanks to Richie Oliver for sharing his original idea.
Paul Fennell
Disclaimer:
Installing hardware may cause damage and/or void manufacturer warranties. The information we provide is a free reference guide only. The author of this information, sponsors and the owners of the website that host this information are not liable for any problems or issues that arise from the use of this information. Users of this information hereby acknowledge that all use of this information is done by their own free will, at their own sole risk, understanding that injury or death could occur.