Bait Tank - Simon Hartley (SpeciMan)
A bait tank needs to store a variety of bait, all of whom have different requirements, space availability, water flow rate and flow direction. Joey mackeral, pout, prawns, small pollack, gobies and spider crab are all possible residents for the tank. Obviously they can't be kept in the tank at the same time, but the tank needs to be adaptable.
Other requirements are a quiet pump and all pipework should be kept inboard to eliminate any unnecessary drag.
First requirement was to find a plastic crate that will fit comfortably in the tankwell. Simon's tank is designed to fit in a Scupper Pro and he was able to find the crate at Wilkinson's, something similar will be available at most DIY stores.
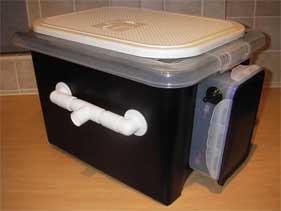
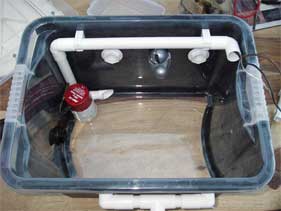
A Rule 360 livewell pump was aligned and fitted over the tankwell scupper hole and a black drain tap installed near the bottom. The pump had its intake tube trimmed right down. One end of a small section of hose pipe is fitted into the end of the intake tube whilst the other sits half way down the scupper hole in the tankwell. On either side of the crate 2 x 22 mm holes are drilled and a 22 mm overflow pipe and connectors fitted for drainage. A T-piece on either side is used to direct out flowing water from the tank silently out onto the gunwale and into the sea.
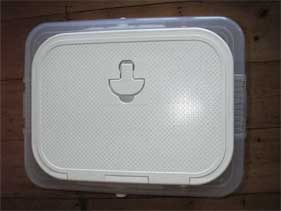
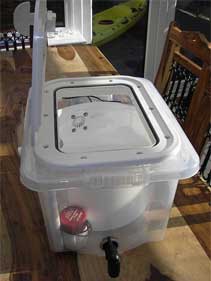
A hole was cut out in the crate lid and a rectangular locker door was glued and screwed, it was almost a perfect fit.
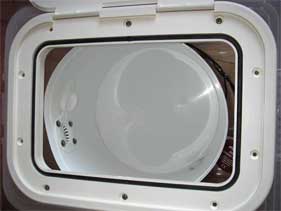
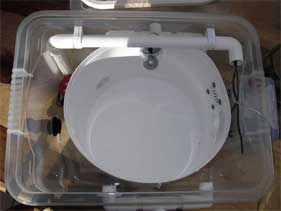
Simon spent some time researching the species likely to be staying in the bait tank. Species like mackeral need to keep moving so that they continue to get flowing water through their gills in order to survive. For these types of species rounded tanks or tanks with rounded corners are favoured. Simon found a light weight flexible tub, drilled a drainage hole in the tub and fitted a cover over the top. He then angled the pump outlet pipe so it was almost flush with the sides and wouldn't interfere with the fish swimming around. The coriolis force is an effect of the earth's rotation and causes water in the northern hemisphere to go down the plug hole in a clockwise direction. Its advised that the flow in bait tanks used in the northern hemisphere should also be in a clockwise direction (apparently fish prefer it this way);the pump outlet pipe was angled in this direction. Water flows into the tub and out of its drainage hole then into the main crate and out through the T-pieces. As the pump is always submerged the pump noise is reduced.
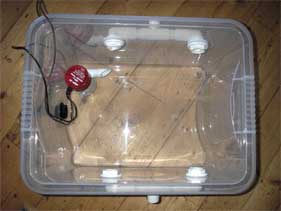
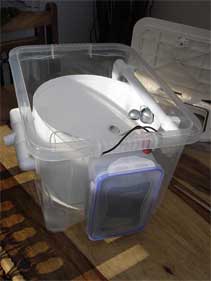
A 6 volt submersible aquarium light was then fitted to the crate. A red led light was chosen as a more friendly option for use at night, nocturnal fish are also less likely to be spooked with this colour. Some uPVC pipe and connectors were used to house the wiring from the pump to the battery container and the wiring for the light, the light can be moved around the tank and is secured with a suction cup.
An airtight container (available at most supermarkets) was bolted to the tank and houses the 12 amp hour 6 volt battery.
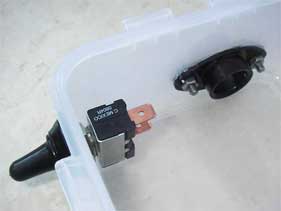
A waterproof toggle switch was fitted to the battery box. Both the pump and light were connected to the switch. A rubber bung was fitted to the battery box where the wires pass through to prevent any leaks.
The bait tank is 'dry' built.
The bait tank was covered in black sticky back plastic to prevent the light being seen by other boats at night. After the dry build all fittings were coated in sealant before fitting to ensure there were no leaks.
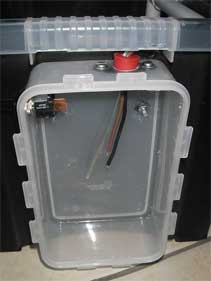
Here the wiring is complete and the battery is fitted. Ready for testing.

Bath tests - the tank is being filled and the red led light proving very impressive.
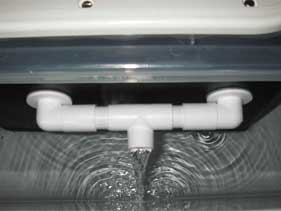
Water flowing through the T-piece.
The tank will be attached to the tankwell using snap clips which fit through the lid and crate.
Running the 12 volt pump to a 6 volt battery significantly reduces the flow rate to about 60 gallons per hour. Bait should tire less at this speed and small fish won't be blasted out of the water. It's also much quieter at 6 volts and uses less power. Simon has tested the 12 amp volt battery, after 9 hours he decided to turn it off!

A few additions are still required to complete the project. One a shallow mesh bottomed floating container for ragworm and second a small container for keeping shrimps out of the flow and thirdly a thermometer for accurate readings of water temperature.
Initial on kayak testing went better than expected, there was no need to feed a length of tube through the scupper hole for the water uptake and for most of the time the pump remained very quiet.
When sat in the kayak there is enough water coming up through the tankwell scupper holes to keep up with the rate of flow from the pump. Also as the threaded tube attached to the pump has been cut right down there was no need to prime the pump - flick the switch and water immediately starts to flow.
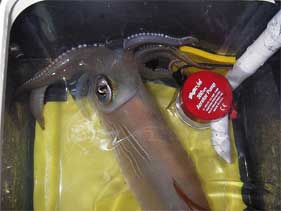
One of the first residents.
The wires from the pump need to be protected, if squid wraps it's tentacles around the wires no harm done but there maybe a chance that a spider crab would cut through them.
Disclaimer:
Installing hardware may cause damage and/or void manufacturer warranties. The information we provide is a free reference guide only. The author of this information, sponsors and the owners of the website that host this information are not liable for any problems or issues that arise from the use of this information. Users of this information hereby acknowledge that all use of this information is done by their own free will, at their own sole risk, understanding that injury or death could occur.