Anchor Trolley System for 2007 Prowler 13 or Elite 4.5
Fitting an Anchor Trolley System to your kayak is arguably one of the most important items that you can install. Fitted correctly it can mean a comfortable safe and relaxing days fishing, fitted badly it can be extremely dangerous.
6 metres, 4 mm low stretch rope.
2 x 20 cm, 5 mm elastic rope.
2 x Seasure 25 mm roller block.
1 x Seasure 30 mm O-Ring.
1 x Carabineer.
2 x 17 mm deck eyes.
5 x 5M Bolts.
1 x Plastic clip.
1 x 0.75 kg Folding Anchor.
1 metre, Galvanised Chain.
2 x Galvanised Shackle.
1 x 10 cm Cable Tie.
1 x SMB Divers Reel (80m with shackle)
The Prowler 13 Angler Edition has been updated for 2007, not only does it have the Scupper Transducer Hole but brass fittings have been inserted in the bow, stern and gunwale to accommodate the Stephen Tapp anchor trolley kit.
The fittings are on the port (left), we have always set out trolleys up on the right which feels comfortable (and some how right) but we decided to utilise the new brass inserts on the new Prowler.
We took a trip to the chandlers with the new Prowler 13 and asked the manager if it was alright to take a few bolts and fittings out to try for size, finally settling on purchasing a pair of deck eyes which measured 42 mm from hole to hole and 5 x 5M bolts, the 42 mm deck eyes are a 5 mm short of fitting, but were the nearest available.
To enlarge the spread of the deck eye, we placed over a steel pipe and tapped with a hammer, checking regularly for alignment with the standard brass inserts in the deck, this was done for both the deck eyes.
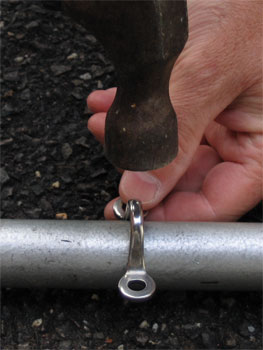
Enlarging the spread of the deck eye...
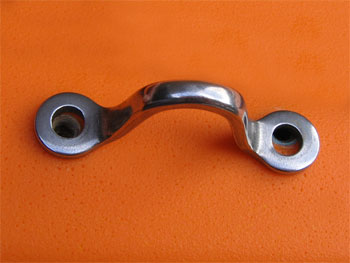
... until it fits the brass inserts.
It was then necessary to cut the bolts down so the threaded length was 12mm, this is best done using a vise to hold the bolts tight and a bit of patience so as not to ruin the threads.
We fitted one of the deck eyes to the bow and the second one using the brass fittings just beyond the tankwell.
A Seasure roller block was fitted to the front and rear deck eyes using a 20cm piece of elasticated rope, tying the ends together with a simple thumb knot, trimming the ends and sealing with a cigarette lighter.
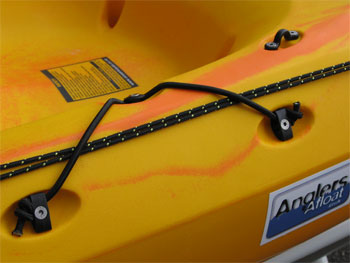
Running the low stretch rope through both roller blocks we realised that the trolley would be running across the cockpit, having lines crossing the cockpit area could be dangerous in a capsize, a decision was made to move the front roller block back to the rope tidy which aligns with the front of the hatch, threading the elasticated rope through the empty top section of the rope tidy.
The bow roller block fitted.
Stern rolle block fitted.
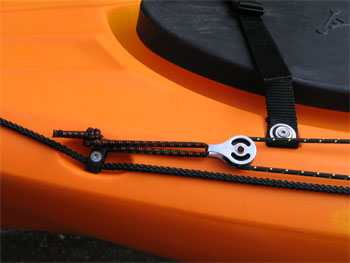
Revised trolley layout does not cross the cockpit.The front roller has twisted in the photo and the top line is actually the bottom of the trolley when under tension at anchor.
The trolley line was then run through the top of both roller blocks, via the second to last tankwell rope tidy, the line could be run through the rope tidy below the tankwell if preferred.
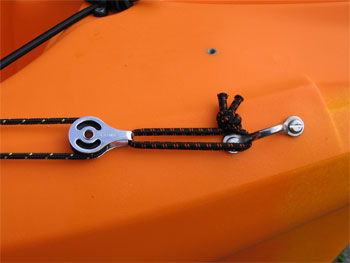
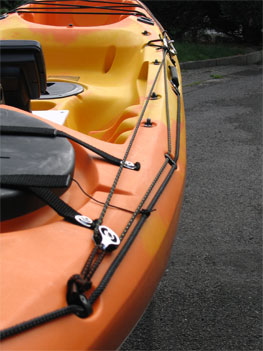
We tied an O-Ring onto the rear end of the trolley line, using a barrel knot to secure. Please note that it is important that O-Ring is to the rear of the kayak.
We clipped the carabineer to the O-Ring so that it opens to the rear and faces down. Threaded the trolley line through the rope tidy behind the hatch before attaching the carabineer and pulling tight so that the elastic rope holding the roller blocks stretched a little, fastening the carabineer with a barrel knot. Ensure there is no slack in the rope as it will stretch a little on the first couple of outings.
Fitting the trolley around this way round allows the carabineer to be unclipped and used to tow the kayak when wading.
Just to tidy the trolley line we have fitted a small plastic hook beside the paddle keep, there is a brass insert which was perfectly positioned for this, one bolt was enough to hold tight.

Plastic clip tidy.
When in use we lock the trolley in position by trapping the trolley line under the paddle keep, this has worked well with no slippage. To control the anchor line we are using an SMB (Small Marker Buoy) divers reel (bought on ebay) it carries 80 meters of line. The line is let out via a lever and ratchet, the line is locked by the ratchet. The SMB reel is clipped to one of the gunwale deck eyes. It's worth noting that the SMB reel does not allow you to reel the anchor line in when under load, the anchor has to be hauled by hand, but the SMB reel does allow the line to be kept tidy once hauled onboard.
Paddle keep used to lock anchor trolley.
Anchor deployed showing SMB reel in position clipped to cockpit deck eye.
If you choose to use the smaller 0.75 kg grapnel anchor ensure you use a galvanised shackle at both ends of the anchor if fitting an anchor trip, if this is not done the anchor locking collar will be lost every time the anchor is tripped!
Disclaimer:
Installing hardware may cause damage and/or void manufacturer warranties.
The information we provide is a free reference guide only. The author of this information, sponsors and the owners of the website that host this information are not liable for any problems or issues that arise from the use of this information. Users of this information hereby acknowledge that all use of this information is done by their own free will, at their own sole risk, understanding that injury or death could occur.